GCC toolchain for mbed on STM32F411RE Nucleo
This blog post is what I wanted to find on the Internet when I bought my new Nucleo STM32F411RE microcontroller board. I am absolutely pumped about working with this board. I have done some experimentation with the ARM Cortex microcontrollers (primarily with a Teensy USB 3.1), but I have some projects that require me to step it up and enter this world a little more thoroughly.
The Nucleo is a fantastic board – 100mHz ARM Cortex M4 (with FPU), half a megabyte of flash, all I/O ports exposed, and for only $10.33 at Mouser! After playing with it enough to get the hang of it, I am convinced that this is a really powerful platform, and under-appreciated for what it is.
MBED
You can’t talk about the Nucleo boards without mentioning the mbed environment. This is a cloud-based IDE/compiler environment where various ARM Cortex manufacturers provide “back-end” drivers for their chips and everything get’s abstracted nicely with a very high-level API. At first, I was worried that this was on the level of the Arduino training wheels, but the more I play with it, the more powerful I realize it is.
There are some blogs that suggest that Real Men(TM) code to the bare metal and eschew even STM’s hardware abstraction layer. But this is really premature optimization. If you have any familiarity with the Arduino software environment, the MBED API will seem similar enough. But there’s actually a lot more power here, since all of the hardware platforms conform to a higher level of basic functionality than the MCUs used on the Arduinos.
But… there’s a drawback. MBED is cloud-based, and the platform has drawn criticism, perhaps rightly so, for originally forcing developers to use the Internet-access-only environment. Well, times have changed somewhat, and you can use the MBED SDK offline. For me, since I do lots of coding while traveling, this is a necessary feature since I don’t always have access to the Internet. Plus, I don’t necessarily like the idea of my code being controlled by someone else (until I publish it, of course!).
But therein is another hurdle. Most of the environments you’ll see for offline MBED development are not so open-source and GNU/Linux friendly. Some are outright expensive. Almost all of them are Windows-only. And a few are free trials, which never sits well with me. I want Emacs, a compiler, and a Makefile. That’s what this blog is about – how to get your MBED code into a position where you can program your way and get things done in Linux.
Compilers and Libraries
You’ll need a couple things to compile code for the ARM Cortex CPU and support the software library expectations of the MBED SDK. These include an ARM embedded ABI (EABI) cross-compiler and the newlib base library. In Ubuntu 14.04, this worked well for me:
josh@ubuntu:~$ sudo apt-get install gcc-arm-none-eabi libnewlib-arm-none-eabi
josh@ubuntu:~$ sudo apt-get install g++-4.8-multilib
But there’s one more hurdle. If you’re an LTS user like me (got burned on those .10 releases long ago!), you’ll find that there’s a quirk in the current packages for 14.04. Some header files will be missing. This can be fixed a few ways, but I found the quickest way was to install the libstdc++-arm-none-eabi-newlib package manually (it’s not in the repositories). I’m not going to say this is the best way to do it, but it worked for me:
josh@ubuntu:~$ wget http://mirrors.kernel.org/ubuntu/pool/universe/libs/libstdc++-arm-none-eabi/libstdc++-arm-none-eabi-newlib_4.8.3-11ubuntu1+4_all.deb
josh@ubuntu:~$ sudo dpkg -i libstdc++-arm-none-eabi-newlib_4.8.3-11ubuntu1+4_all.deb
OpenOCD
We also need something that can access the JTAG / SWD functionality on the Nucleo board. This is best done with OpenOCD. There is a package in the Ubuntu repository for this, but it doesn’t come with definitions for all the Nucleo boards. This is the kind of software you want to compile yourself anyway to stay up to date, though, so I installed it from the Github repository. Here’s how it went for me.
Install some prerequisites:
josh@ubuntu:~/nucleo/openocd$ sudo apt-get install libtool
josh@ubuntu:~/nucleo/openocd$ sudo apt-get install automake
josh@ubuntu:~/nucleo/openocd$ sudo apt-get install libusb-1.0.0-dev
Download the Github repository:
josh@ubuntu:~/nucleo$ git clone https://github.com/ntfreak/openocd
Cloning into 'openocd'...
remote: Counting objects: 49390, done.
remote: Total 49390 (delta 0), reused 0 (delta 0)
Receiving objects: 100% (49390/49390), 13.56 MiB | 1.46 MiB/s, done.
Resolving deltas: 100% (40608/40608), done.
Checking connectivity... done.
Bootstrap the compilation process:
josh@ubuntu:~/nucleo$ cd openocd
josh@ubuntu:~/nucleo/openocd$ ./bootstrap
+ aclocal
+ libtoolize --automake --copy
+ autoconf
+ autoheader
+ automake --gnu --add-missing --copy
configure.ac:26: installing './compile'
configure.ac:37: installing './config.guess'
configure.ac:37: installing './config.sub'
configure.ac:16: installing './install-sh'
configure.ac:16: installing './missing'
Makefile.am:23: warning: wildcard $(srcdir: non-POSIX variable name
. . .
Run configure. I include some more output here because you want to make sure that you have lots of “yes” autoconfigurations. If you didn’t install the right libusb-1.0.0-dev package or something else is missing, you may not be able to connect to devices. Make sure this looks something like what’s below:
josh@ubuntu:~/nucleo/openocd$ ./configure
checking for makeinfo... no
configure: WARNING: Info documentation will not be built.
checking for a BSD-compatible install... /usr/bin/install -c
checking whether build environment is sane... yes
checking for a thread-safe mkdir -p... /bin/mkdir -p
checking for gawk... gawk
checking whether make sets $(MAKE)... yes
checking whether make supports nested variables... yes
. . .
jim-config.h is unchanged
jimautoconf.h is unchanged
Created Makefile from Makefile.in
Created build-jim-ext from build-jim-ext.in


OpenOCD configuration summary
--------------------------------------------------
MPSSE mode of FTDI based devices        yes (auto)
ST-Link JTAG Programmer                 yes (auto)
TI ICDI JTAG Programmer                 yes (auto)
Keil ULINK JTAG Programmer              yes (auto)
Altera USB-Blaster II Compatible        yes (auto)
Versaloon-Link JTAG Programmer          yes (auto)
Segger J-Link JTAG Programmer           yes (auto)
OSBDM (JTAG only) Programmer            yes (auto)
eStick/opendous JTAG Programmer         yes (auto)
Andes JTAG Programmer                   yes (auto)
USBProg JTAG Programmer                 no
Raisonance RLink JTAG Programmer        no
Olimex ARM-JTAG-EW Programmer           no
CMSIS-DAP Compliant Debugger            no

josh@ubuntu:~/nucleo/openocd$
Now make and install the package:
josh@ubuntu:~/nucleo/openocd$ make && sudo make install
. . .
make  install-data-hook
make[3]: Entering directory `/home/josh/nucleo/openocd'
for i in $(find ./tcl -name '*.cfg' -o -name '*.tcl' -o -name '*.txt' | sed -e 's,^./tcl,,'); do \
		j="/usr/local/share/openocd/scripts/$i" && \
		mkdir -p "$(dirname $j)" && \
		/usr/bin/install -c -m 644 ./tcl/$i $j; \
	done
make[3]: Leaving directory `/home/josh/nucleo/openocd'
make[2]: Leaving directory `/home/josh/nucleo/openocd'
make[1]: Leaving directory `/home/josh/nucleo/openocd'
josh@ubuntu:~/nucleo/openocd$
STLINK
I don’t know if this is necessary, but stlink is another tool you can use to communicate directly with STM’s st-link interfaces. Start by downloading the repository from Github:
josh@ubuntu:~/nucleo$ git clone https://github.com/texane/stlink
Cloning into 'stlink'...
remote: Counting objects: 4364, done.
remote: Total 4364 (delta 0), reused 0 (delta 0)
Receiving objects: 100% (4364/4364), 13.31 MiB | 2.09 MiB/s, done.
Resolving deltas: 100% (2704/2704), done.
Checking connectivity... done.
Generate the configure script, compile, and install it:
josh@ubuntu:~/nucleo/stlink$ ./autogen.sh
josh@ubuntu:~/nucleo/stlink$ ./configure
josh@ubuntu:~/nucleo/stlink$ make && sudo make install
Here’s why stlink might be a good idea to have installed. It comes with some UDEV rules that will make sure that Linux does the right thing when you plug the USB port in:
josh@ubuntu:~/nucleo/stlink$ sudo cp 49-stlinkv2-1.rules /etc/udev/rules.d/
josh@ubuntu:~/nucleo/stlink$ sudo service udev restart
udev stop/waiting
udev start/running, process 4291
MBED Code Export
Now we have what we need to compile code. What we need next is some code to compile! The MBED web site really is very cool. There are a number of basic programs you can start with and manipulate. At any time you can compile the code and download a binary to write to the flash on your microcontroller. But what we’re interested in is the export feature. This will let us get a fully-functional MBED environment that we can use for offline development.
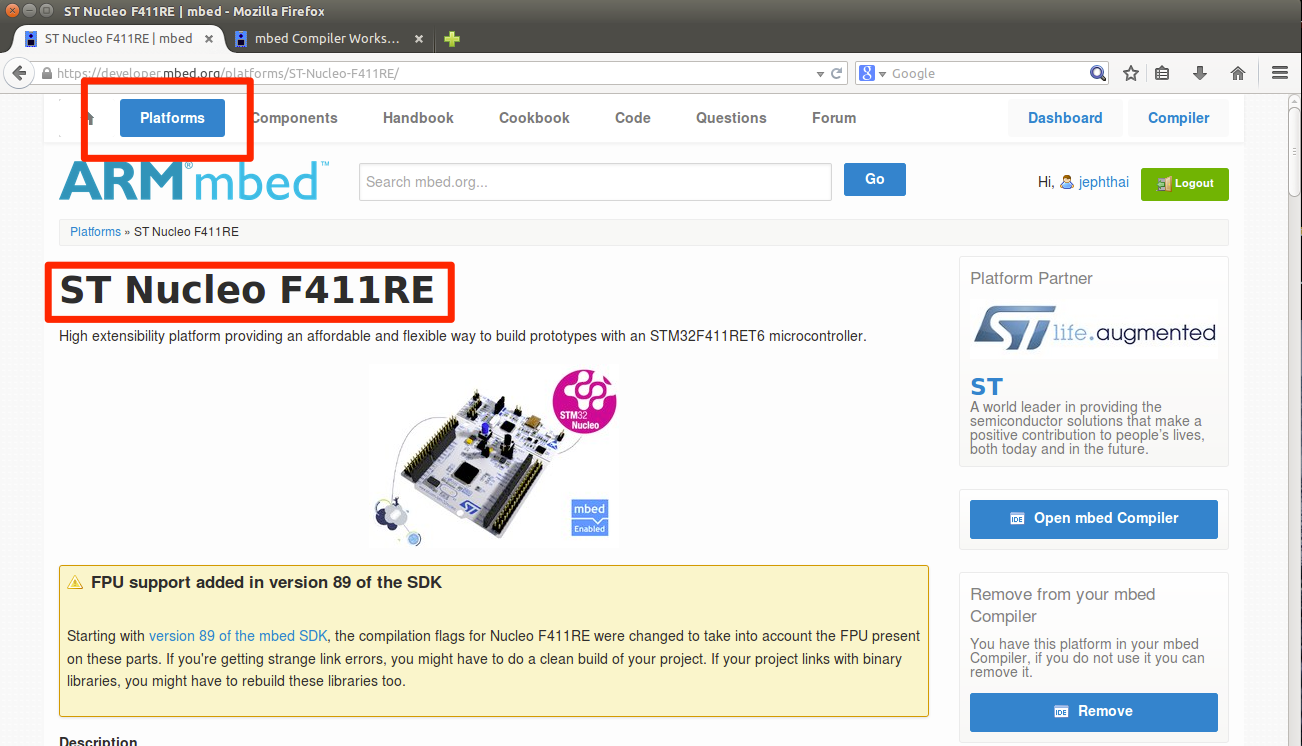
I’ll assume that you can create an account on the MBED web site – it’s just a username and password like anywhere else. Once you have the account, make sure you add your hardware platform to your profile. This is important because the MBED SDK is a front-end API that has to have hardware-specific drivers on the back end to make it work with your hardware. It’s chip-specific, so make sure you choose the right one. Navigate to the “Platform” section, search for the device you have (I’m using an STM32F411RE), and make sure it’s added to your profile like below:
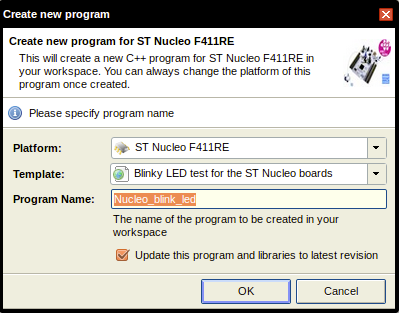
Now, enter the “Compiler” part of the site and create a new program (“New” -> “New Program”). Make sure your hardware platform is selected, and choose something simple like the “Blink LED” program. Selecting it should look something like this:
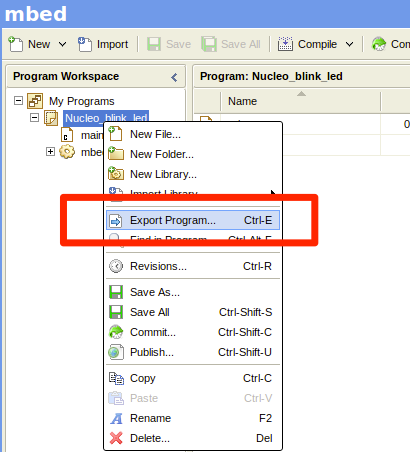
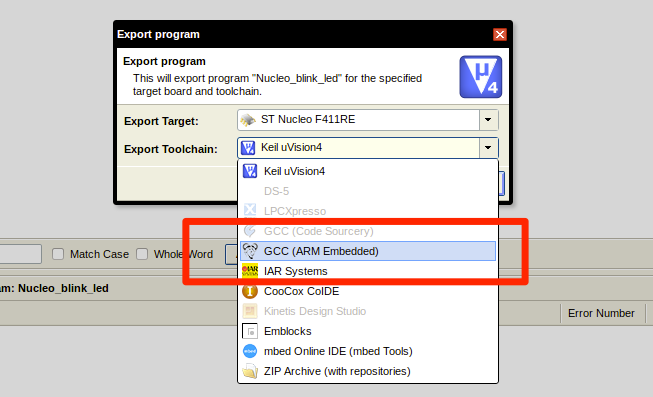
Now export the code to a file. The MBED supports lots of different targets, but the one we’re interested in is the GCC ARM environment. These screenshots should help you get to the right spot:
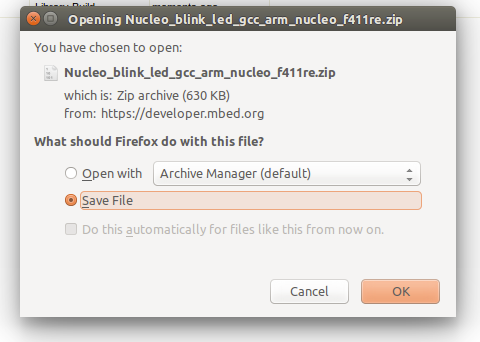
I’m sure everyone knows how to unzip the file, but for completeness, here’s how I got it unpacked:
josh@ubuntu:~$ mkdir nucleo
josh@ubuntu:~$ cd nucleo
josh@ubuntu:~/nucleo$ unzip ~/Downloads/Nucleo_blink_led_gcc_arm_nucleo_f411re.zip Archive:  /home/josh/Downloads/Nucleo_blink_led_gcc_arm_nucleo_f411re.zip
  inflating: Nucleo_blink_led/mbed.bld
  inflating: Nucleo_blink_led/main.cpp
  inflating: Nucleo_blink_led/.hgignore
  inflating: Nucleo_blink_led/Makefile
  inflating: Nucleo_blink_led/mbed/analogout_api.h
  . . .
Fix the Makefile
This step may vary for different Linux distributions and releases. I found that on Ubuntu 14.04 there were a few issues with include directories, etc. There may be cleaner ways to make this work, but I found that adding the right flags in the Makefile made everything compile. If you don’t do this, then make will give you errors, and you’ll have to figure out what to do.
Open the Makefile in an editor and look for the line where INCLUDE_PATHS is defined. Add two more -I... flags to the end of it so that it looks probably something like this (note, don’t include the backslashes and newlines; I just want this to fit on the screen):
INCLUDE_PATHS = -I. -I./mbed -I./mbed/TARGET_NUCLEO_F411RE -I./mbed/TARGET_NUCLEO_F411RE/TOOLCHAIN_GCC_ARM \
-I./mbed/TARGET_NUCLEO_F411RE/TARGET_STM -I./mbed/TARGET_NUCLEO_F411RE/TARGET_STM/TARGET_NUCLEO_F411RE \
-I/usr/include/newlib/c++/4.8 -I/usr/include/newlib/c++/4.8/arm-none-eabi/
There is also a --specs flag that needs to be changed. Find the definition of LD_FLAGS and make it look something like this:
LD_FLAGS = $(CPU) -Wl,--gc-sections --specs=nosys.specs -u _printf_float -u _scanf_float
Compile your Program
Now it should compile with a straightforward make. If not, then look back above and make sure you did everything to this point. It’s also possible that you have other unique system configurations that get in the way, so look closely at the error messages. I include the full output here so you have as much information as possible:
josh@ubuntu:~/nucleo/Nucleo_blink_led$ make
make: Warning: File `main.cpp' has modification time 2.8e+04 s in the future
arm-none-eabi-g++ -mcpu=cortex-m4 -mthumb -mfpu=fpv4-sp-d16 -mfloat-abi=softfp -c -g -fno-common -fmessage-length=0 -Wall -fno-exceptions -ffunction-sections -fdata-sections -fomit-frame-pointer -MMD -MP -DNDEBUG -Os -DTARGET_NUCLEO_F411RE -DTARGET_M4 -DTARGET_CORTEX_M -DTARGET_STM -DTARGET_STM32F4 -DTARGET_STM32F411RE -DTOOLCHAIN_GCC_ARM -DTOOLCHAIN_GCC -D__CORTEX_M4 -DARM_MATH_CM4 -D__FPU_PRESENT=1 -DMBED_BUILD_TIMESTAMP=1417383839.53 -D__MBED__=1 -DTARGET_FF_ARDUINO -DTARGET_FF_MORPHO  -std=gnu++98 -fno-rtti -I. -I./mbed -I./mbed/TARGET_NUCLEO_F411RE -I./mbed/TARGET_NUCLEO_F411RE/TOOLCHAIN_GCC_ARM -I./mbed/TARGET_NUCLEO_F411RE/TARGET_STM -I./mbed/TARGET_NUCLEO_F411RE/TARGET_STM/TARGET_NUCLEO_F411RE -I/usr/include/newlib/c++/4.8 -I/usr/include/newlib/c++/4.8/arm-none-eabi -o main.o main.cpp
arm-none-eabi-gcc -mcpu=cortex-m4 -mthumb -mfpu=fpv4-sp-d16 -mfloat-abi=softfp -Wl,--gc-sections --specs=nosys.specs -u _printf_float -u _scanf_float -Wl,-Map=Nucleo_blink_led.map,--cref -T./mbed/TARGET_NUCLEO_F411RE/TOOLCHAIN_GCC_ARM/NUCLEO_F411RE.ld -L./mbed/TARGET_NUCLEO_F411RE/TOOLCHAIN_GCC_ARM  -o Nucleo_blink_led.elf main.o mbed/TARGET_NUCLEO_F411RE/TOOLCHAIN_GCC_ARM/stm32f4xx_hal_cryp.o mbed/TARGET_NUCLEO_F411RE/TOOLCHAIN_GCC_ARM/stm32f4xx_hal_tim_ex.o mbed/TARGET_NUCLEO_F411RE/TOOLCHAIN_GCC_ARM/stm32f4xx_ll_fmc.o mbed/TARGET_NUCLEO_F411RE/TOOLCHAIN_GCC_ARM/stm32f4xx_hal_rcc.o mbed/TARGET_NUCLEO_F411RE/TOOLCHAIN_GCC_ARM/stm32f4xx_hal_smartcard.o mbed/TARGET_NUCLEO_F411RE/TOOLCHAIN_GCC_ARM/stm32f4xx_hal_pwr_ex.o mbed/TARGET_NUCLEO_F411RE/TOOLCHAIN_GCC_ARM/stm32f4xx_ll_fsmc.o mbed/TARGET_NUCLEO_F411RE/TOOLCHAIN_GCC_ARM/stm32f4xx_hal_rng.o mbed/TARGET_NUCLEO_F411RE/TOOLCHAIN_GCC_ARM/stm32f4xx_hal_eth.o mbed/TARGET_NUCLEO_F411RE/TOOLCHAIN_GCC_ARM/cmsis_nvic.o mbed/TARGET_NUCLEO_F411RE/TOOLCHAIN_GCC_ARM/stm32f4xx_hal.o mbed/TARGET_NUCLEO_F411RE/TOOLCHAIN_GCC_ARM/stm32f4xx_hal_dma_ex.o mbed/TARGET_NUCLEO_F411RE/TOOLCHAIN_GCC_ARM/stm32f4xx_ll_sdmmc.o mbed/TARGET_NUCLEO_F411RE/TOOLCHAIN_GCC_ARM/stm32f4xx_hal_hcd.o mbed/TARGET_NUCLEO_F411RE/TOOLCHAIN_GCC_ARM/hal_tick.o mbed/TARGET_NUCLEO_F411RE/TOOLCHAIN_GCC_ARM/stm32f4xx_hal_pccard.o mbed/TARGET_NUCLEO_F411RE/TOOLCHAIN_GCC_ARM/stm32f4xx_hal_dac_ex.o mbed/TARGET_NUCLEO_F411RE/TOOLCHAIN_GCC_ARM/stm32f4xx_hal_irda.o mbed/TARGET_NUCLEO_F411RE/TOOLCHAIN_GCC_ARM/stm32f4xx_hal_sd.o mbed/TARGET_NUCLEO_F411RE/TOOLCHAIN_GCC_ARM/stm32f4xx_hal_sai.o mbed/TARGET_NUCLEO_F411RE/TOOLCHAIN_GCC_ARM/stm32f4xx_hal_i2s_ex.o mbed/TARGET_NUCLEO_F411RE/TOOLCHAIN_GCC_ARM/stm32f4xx_hal_sram.o mbed/TARGET_NUCLEO_F411RE/TOOLCHAIN_GCC_ARM/stm32f4xx_hal_spi.o mbed/TARGET_NUCLEO_F411RE/TOOLCHAIN_GCC_ARM/stm32f4xx_hal_adc_ex.o mbed/TARGET_NUCLEO_F411RE/TOOLCHAIN_GCC_ARM/stm32f4xx_hal_gpio.o mbed/TARGET_NUCLEO_F411RE/TOOLCHAIN_GCC_ARM/stm32f4xx_hal_flash.o mbed/TARGET_NUCLEO_F411RE/TOOLCHAIN_GCC_ARM/stm32f4xx_hal_pcd_ex.o mbed/TARGET_NUCLEO_F411RE/TOOLCHAIN_GCC_ARM/board.o mbed/TARGET_NUCLEO_F411RE/TOOLCHAIN_GCC_ARM/stm32f4xx_hal_hash.o mbed/TARGET_NUCLEO_F411RE/TOOLCHAIN_GCC_ARM/stm32f4xx_hal_adc.o mbed/TARGET_NUCLEO_F411RE/TOOLCHAIN_GCC_ARM/stm32f4xx_hal_iwdg.o mbed/TARGET_NUCLEO_F411RE/TOOLCHAIN_GCC_ARM/stm32f4xx_hal_flash_ex.o mbed/TARGET_NUCLEO_F411RE/TOOLCHAIN_GCC_ARM/stm32f4xx_hal_rtc_ex.o mbed/TARGET_NUCLEO_F411RE/TOOLCHAIN_GCC_ARM/stm32f4xx_hal_nor.o mbed/TARGET_NUCLEO_F411RE/TOOLCHAIN_GCC_ARM/stm32f4xx_hal_i2s.o mbed/TARGET_NUCLEO_F411RE/TOOLCHAIN_GCC_ARM/system_stm32f4xx.o mbed/TARGET_NUCLEO_F411RE/TOOLCHAIN_GCC_ARM/stm32f4xx_hal_sdram.o mbed/TARGET_NUCLEO_F411RE/TOOLCHAIN_GCC_ARM/stm32f4xx_hal_pcd.o mbed/TARGET_NUCLEO_F411RE/TOOLCHAIN_GCC_ARM/stm32f4xx_hal_uart.o mbed/TARGET_NUCLEO_F411RE/TOOLCHAIN_GCC_ARM/stm32f4xx_hal_i2c.o mbed/TARGET_NUCLEO_F411RE/TOOLCHAIN_GCC_ARM/stm32f4xx_hal_cortex.o mbed/TARGET_NUCLEO_F411RE/TOOLCHAIN_GCC_ARM/stm32f4xx_hal_rtc.o mbed/TARGET_NUCLEO_F411RE/TOOLCHAIN_GCC_ARM/stm32f4xx_hal_ltdc.o mbed/TARGET_NUCLEO_F411RE/TOOLCHAIN_GCC_ARM/stm32f4xx_hal_tim.o mbed/TARGET_NUCLEO_F411RE/TOOLCHAIN_GCC_ARM/stm32f4xx_ll_usb.o mbed/TARGET_NUCLEO_F411RE/TOOLCHAIN_GCC_ARM/stm32f4xx_hal_hash_ex.o mbed/TARGET_NUCLEO_F411RE/TOOLCHAIN_GCC_ARM/stm32f4xx_hal_rcc_ex.o mbed/TARGET_NUCLEO_F411RE/TOOLCHAIN_GCC_ARM/retarget.o mbed/TARGET_NUCLEO_F411RE/TOOLCHAIN_GCC_ARM/mbed_overrides.o mbed/TARGET_NUCLEO_F411RE/TOOLCHAIN_GCC_ARM/stm32f4xx_hal_dma.o mbed/TARGET_NUCLEO_F411RE/TOOLCHAIN_GCC_ARM/startup_STM32F41x.o mbed/TARGET_NUCLEO_F411RE/TOOLCHAIN_GCC_ARM/stm32f4xx_hal_can.o mbed/TARGET_NUCLEO_F411RE/TOOLCHAIN_GCC_ARM/stm32f4xx_hal_dma2d.o mbed/TARGET_NUCLEO_F411RE/TOOLCHAIN_GCC_ARM/stm32f4xx_hal_dac.o mbed/TARGET_NUCLEO_F411RE/TOOLCHAIN_GCC_ARM/stm32f4xx_hal_flash_ramfunc.o mbed/TARGET_NUCLEO_F411RE/TOOLCHAIN_GCC_ARM/stm32f4xx_hal_crc.o mbed/TARGET_NUCLEO_F411RE/TOOLCHAIN_GCC_ARM/stm32f4xx_hal_pwr.o mbed/TARGET_NUCLEO_F411RE/TOOLCHAIN_GCC_ARM/stm32f4xx_hal_wwdg.o mbed/TARGET_NUCLEO_F411RE/TOOLCHAIN_GCC_ARM/stm32f4xx_hal_i2c_ex.o mbed/TARGET_NUCLEO_F411RE/TOOLCHAIN_GCC_ARM/stm32f4xx_hal_cryp_ex.o mbed/TARGET_NUCLEO_F411RE/TOOLCHAIN_GCC_ARM/stm32f4xx_hal_nand.o mbed/TARGET_NUCLEO_F411RE/TOOLCHAIN_GCC_ARM/stm32f4xx_hal_usart.o mbed/TARGET_NUCLEO_F411RE/TOOLCHAIN_GCC_ARM/stm32f4xx_hal_dcmi.o -lmbed  -lstdc++ -lsupc++ -lm -lc -lgcc -lnosys -lmbed  -lstdc++ -lsupc++ -lm -lc -lgcc -lnosys
arm-none-eabi-size Nucleo_blink_led.elf
   text	   data	    bss	    dec	    hex	filename
  31456	   2244	    592	  34292	   85f4	Nucleo_blink_led.elf
make: warning:  Clock skew detected.  Your build may be incomplete.
The result is several files in your directory that we can use to debug the program and flash the microcontroller:
josh@ubuntu:~/nucleo/Nucleo_blink_led$ ls -l
total 1240
-rw-r--r-- 1 josh josh    214 Nov 30  2014 main.cpp
-rw-rw-r-- 1 josh josh   9446 Nov 30 14:02 main.d
-rw-rw-r-- 1 josh josh  18232 Nov 30 14:02 main.o
-rw-r--r-- 1 josh josh   6884 Nov 30 14:01 Makefile
-rw-r--r-- 1 josh josh   6810 Nov 30 13:57 Makefile.orig
drwxrwxr-x 4 josh josh   4096 Nov 30 13:43 mbed
-rw-r--r-- 1 josh josh     65 Nov 30  2014 mbed.bld
-rwxrwxr-x 1 josh josh  33700 Nov 30 14:02 Nucleo_blink_led.bin
-rwxrwxr-x 1 josh josh 337694 Nov 30 14:02 Nucleo_blink_led.elf
-rw-rw-r-- 1 josh josh  94855 Nov 30 14:02 Nucleo_blink_led.hex
-rw-rw-r-- 1 josh josh 758946 Nov 30 14:02 Nucleo_blink_led.map
Flash the Microcontroller
You will use OpenOCD to connect to the software debug port, where we can program the microcontroller’s flash memory. Start by connecting to the board using the configuration file for the hardware you’re using:
josh@ubuntu:~/nucleo/Nucleo_blink_led$ openocd -f /usr/local/share/openocd/scripts/board/st_nucleo_f411re.cfg
Open On-Chip Debugger 0.9.0-dev-00207-g9c4d294 (2014-11-27-10:42)
Licensed under GNU GPL v2
For bug reports, read
	http://openocd.sourceforge.net/doc/doxygen/bugs.html
Info : The selected transport took over low-level target control. The results might differ compared to plain JTAG/SWD
adapter speed: 2000 kHz
adapter_nsrst_delay: 100
srst_only separate srst_nogate srst_open_drain connect_deassert_srst
Info : clock speed 2000 kHz
Info : STLINK v2 JTAG v22 API v2 SWIM v5 VID 0x0483 PID 0x374B
Info : using stlink api v2
Info : Target voltage: 3.263559
Info : stm32f4x.cpu: hardware has 6 breakpoints, 4 watchpoints
OpenOCD opens some TCP ports that you can use to connect different clients to the microcontroller. For example, on port 3333 is a remote debugger target for GDB (very handy!). We’re most interested in port 4444, though, where we can connect to run commands. Use telnet for this:
josh@ubuntu:~/nucleo/Nucleo_blink_led$ telnet localhost 4444
Trying 127.0.0.1...
Connected to localhost.
Escape character is '^]'.
Open On-Chip Debugger
>
To program the flash, we need to run three commands. First, we halt the CPU:
> reset halt
target state: halted
target halted due to debug-request, current mode: Thread
xPSR: 0x01000000 pc: 0x08001ad4 msp: 0x20020000
Now we write the Nucleo_blink_led.hex file to flash memory:
> flash write_image erase Nucleo_blink_led.hex
auto erase enabled
device id = 0x10006431
flash size = 512kbytes
wrote 49152 bytes from file Nucleo_blink_led.hex in 2.165905s (22.162 KiB/s)
And start the CPU at the entry point:
> reset run
Conclusion
And that’s it! It seems like a lot, but my initial testing suggests that the MBED SDK is the best way to get feet on the ground running with the Nucleo board. This environment lets me use all the normal C-programming infrastructure I’m used to, with Emacs for editing, using Makefiles, etc., for managing the build process.
One of the nice things is that this gives you the entire MBED SDK in your project directory. Check out the SDK documentation on the MBED site for details on how the different APIs work. You’ll find that in many ways it is more powerful than software frameworks for other embedded environments.